Interesting effect using a simple texture, displacement map and burn tool.
Tutorial link
Thursday, September 30, 2010
Wednesday, September 29, 2010
Day 271: Bird Lady from Cross Country
The Cross Country Invitational at Morley field not only had a ton of runners from multiple states but also an interesting mix of spectators. First, the ROAD, image from last week and now, THE BIRD LADY for today. For the same day. I also have a picture of a woman who looks like she is burping her dog but I'm not sure what to do with that one.
Tutorial link
Tutorial link
Tuesday, September 28, 2010
Day 270: Yearbook Summer Activities
The yearbook class is trying to get good summer activities pictures from the students. I would love to have alligator wrestling, skydiving and climbing the pyramids in the book this year... hopefully someone will give me pictures soon!
Monday, September 27, 2010
Day 269: Rock Text
I really like Corey Barker's tutorials. Since I spent too long trying to find a good concrete texture I didn't figure out the best way to get my brush to taper off the way his did. Ah well... maybe next time :)
Tutorial Link
Tutorial Link
Sunday, September 26, 2010
Day 268: Film Strip Charlie
This was a simple effect using a constrained crop on four images, appliting an inner stroke and using the Distort:Twirl filter to create a twisted photo booth strip.
Tutorial link
Tutorial link
Saturday, September 25, 2010
Day 267: Freaky Long Fingers
Elongated fingers, gradient map, masked eyeballs within fingers and a series of weird textures. It's a bit early for Halloween but I'm getting ready for some freaky days :)
Friday, September 24, 2010
Day 266: More BlackLight Experiment
Here is another experiment with a picture from the black light dance. This time I used a photo that I took with a longer exposure.
Thursday, September 23, 2010
Wednesday, September 22, 2010
Day 264: Abstract Twirl Text
I followed a somewhat simple tutorial effect. The instructions were a bit off but I was able to achieve a similar effect. I messed with the lighting a bit by adding a reflected gradient in the middle to darken the colors in the back. I also add a lens flare set to overlay.
Tutorial link
Tutorial link
Tuesday, September 21, 2010
Day 263: The Road
Before and After: I was out taking pictures of the Cross Country Team at Morley Field. I ran across a rather interesting guy with the most amazing mutton chops I had ever seen. Having recently watched the movie "THE ROAD", combined with the baggage this man was carrying I thought I would try a semi-post apocalyptic style effect. Using a variety of HDR and sharpening techniques combined with several textures , a gradient map and a dry brush filter here is my before and after images.
Monday, September 20, 2010
Day 262: Quick CrossBlur Effect
I made some tone and detail adjustments before I started the motion blur. I also added a slight texture to the image. I originally attempted to do this effect with a darker image but it didn't work. It appears that you need to have a relatively light texture or when you change the blending modes it is almost unrecognizable since there is not enough contrast.
Tutorial Link
Tutorial Link
Sunday, September 19, 2010
Day 261: Color Dodge Text
I added several variations to the tutorial:
Tutorial link
- I duplicated the text layer and added an inner shadow and set that to fill 0%
- I duplicated the small light burst layer and set it to Linear Burn
- Added a curves adjustment layer to pops increase the contrast
Tutorial link
Saturday, September 18, 2010
Day 260: Icy Text
A simple to create text effect. There are eight layer styles applied to a single text layer. I added a separate blurred shadow to the text, a slight, black vignette to the edges and a small amount of dried paint texture. The background is a frozen rose.
Tutorial link
Tutorial link
Friday, September 17, 2010
Day 259: Glass Text
This is perhaps my favorite of the glass text effects I've seen so far. The steps were easy to follow and the effect looks nice. The only think I would change is where the 2 hits the surface line (the serif of the COOPER font I used is too low).
Tutorial link
Tutorial link
Thursday, September 16, 2010
Day 258: Yearbook ID Cards
Here is the rough draft layout for my Yearbook ID cards. It should be no surprise that I used Barney as my test student... it's a sickness!
Wednesday, September 15, 2010
Day 257: Zombie Hand
I played Left 4 Dead 2 way too much this summer... plus I'm drawn to the splatter brushes (maybe too many violent movies and scary novels). I scanned my own hand and followed most of the steps in the tutorial.
Tutorial link
Tutorial link
Tuesday, September 14, 2010
Monday, September 13, 2010
Day 255: Ornamental Text
I started with a tutorial I found but stopped halfway through when the steps were not clear- right around the "GEM" step. I absolutely loved the brushes that were linked on the site. I downloaded several other packs of brushes from the same designer.
Tutorial link
Tutorial link
Sunday, September 12, 2010
Day 254: 3D Football Field

I'm so ready for football today!!! Sunday night- Redskins:Cowboys... Go Skins!
More 3d inside of Photoshop. I'm slowly getting the hang of what effects can be created however I'm still very tentative about what I can make with it. I also realized that I need way more RAM in my machine if I want to render larger 3D images... and here I thought 4GB was plenty!
Go Redskins!
Saturday, September 11, 2010
Day 253: 3D Text
More experimentation with 3D in CS5. After I spent more time working with the Mesh and Camera pans than I had intended I realized that I used day 252 instead of day 253. It would have taken too long to redo so ignore the last two and imagine it was a three instead.
Friday, September 10, 2010
Thursday, September 9, 2010
Day 251: OilPainting Charlie
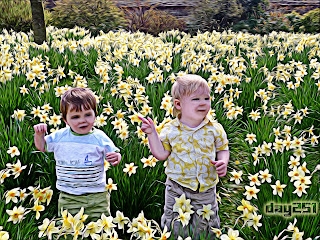
 (Before and After) I played around with several high pass filters, soft light blending mode, an experimental filter from Adobe labs (pixelbender) and the Mixer Brush tool. The effect on the flowers and the clothing is fantastic however the faces are a bit off. I applied a mask to Charlie's eyes to have the pupils show through. I'm eager to try out some more images with this technique.
Wednesday, September 8, 2010
Day 250: WebRedesign
It doesn't seem like much but I added an additional button and page to my class website (LINKS). I messed up the css style sheet pretty bad so I had to tweak on this for a while to get the slices to work.
Tuesday, September 7, 2010
Monday, September 6, 2010
Day 248: War Barney
More propaganda... I took inspiration from a WWII tutorial I found online. I was somewhat limited with how much I could crop the image since the original photo of Barney was cropped at the ears. Overall I really like the finished piece.
Sunday, September 5, 2010
Day 247: Ice Cream Chuck
I tweaked with the HDR Tone Adjustments that are new to CS5. I dropped a grunge paper texture in the background and masked out Charlie's face. The text is a bit hard to read (Keep them coming ice cream man) but after all of the work getting the lighting right... the text was a bit of an afterthought.
Saturday, September 4, 2010
Day 246: Farmer Charlie
Fun stuff. I love using pictures of my nephew, my dog and my friends. It's a nice switch from using stock photos!
Friday, September 3, 2010
Day 245: Class Website
Using Photoshop, Dreamweaver and CSS style sheets I've dramatically reworked my classweb site to pair down the information and focus on the core elements. I wanted the look to be clean, clear and straight forward. I really had to hold back on making a more dramatic and grungy design. I also trimmed the navigation bar in half. I'm not sure if I'm going to need to add more navigation buttons or not... I want Links, a gallery, an attendance report section, an area for blogs.... arghh too much... I need to focus on the essentials... :)
Thursday, September 2, 2010
Day 244: 3D Text
I played around a bit more with the 3D repousse in CS5. Interesting textures. I struggled a bit with the #D settings and tools. I will need more practice.
Wednesday, September 1, 2010
Day 243: Botox
I really like the concept but I'm not happy with the color scheme. The logo doesn't pop off of the background as much as I would like.


